The best strategies for CNC thread milling combine the right tool selection, optimized toolpaths with proper lead-in/out moves, precise control of cutting parameters, and a focus on system rigidity—transforming thread milling from a complex operation into a reliable, high-quality process.
Introduction: The Art of Precision Threading
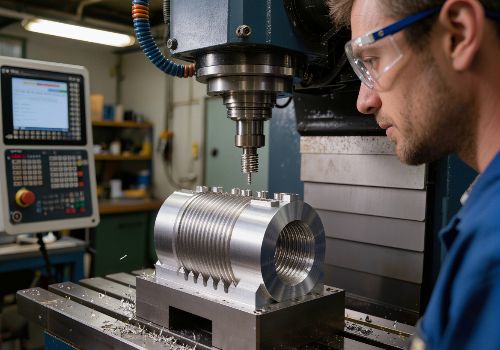
In the world of CNC machining, creating threads is one of the most unforgiving operations. Unlike standard milling where you have flexibility in feeds and speeds, threading locks your feed rate to the thread pitch, concentrating cutting forces repeatedly on the same flank geometry . This makes thread milling both powerful and demanding.
While tapping remains faster for high-volume production, thread milling has emerged as the preferred method for precision components, difficult materials, and applications where thread quality cannot be compromised. The advantages are compelling: one tool can machine multiple thread sizes, both internal and external threads are possible, and the risk of catastrophic tool breakage inside an expensive part is virtually eliminated .
This comprehensive guide explores the strategies that separate successful thread milling operations from frustrating failures.
Choosing the Right Thread Mill: A Strategic Decision
Your thread milling success begins long before the tool touches material—it starts with selecting the right tool for the job.
Thread Mill Configurations
Thread mills generally fall into three main categories, each with distinct advantages
| Tool Type | Best For | Key Characteristics |
|---|---|---|
| Single-Profile (Single-Point) Thread Mills | Maximum flexibility, custom threads, non-standard pitches | One row of teeth; can cut any thread size with same pitch by varying helix |
| Multi-Form (Multi-Point) Thread Mills | Production efficiency, standard thread sizes | Multiple rows of teeth; cuts full thread depth in one revolution |
| Indexable Thread Mills | Large diameter threads, high-volume production | Replaceable inserts; cost-effective for large holes |
The choice between single-profile and multi-form tools hinges on your priorities. A multi-form thread mill cuts faster because it forms multiple threads per pass, but it’s limited to a single pitch governed by the spacing of its teeth . A single-profile thread mill offers maximum flexibility—one tool can machine a wide variety of thread sizes by varying the depth of cut and the pitch of the thread helix.
Critical Selection Rules
The 70% Rule: The thread mill diameter should not exceed 70% of the thread diameter. If it’s larger, the thread profile can become distorted .
Flute Design Matters: For blind holes, consider left-hand spiral tools that lift chips upward out of the hole, improving chip evacuation dramatically .
Helical vs. Straight Flutes: Helical flute thread mills feature cutting edges in a helical pattern, enhancing chip removal and reducing cutting forces—ideal for harder materials like stainless steel and titanium .

The Two Thread Milling Directions: Synchronous vs. Reverse Rotation
Understanding spindle rotation and toolpath direction is fundamental to thread milling success .
Assume clockwise spindle rotation. The difference between reverse rotation and synchronous milling depends on whether the thread mill’s helical motion is clockwise or counter-clockwise:
-
Synchronous Milling (Climb Milling): The helix direction (viewed from above) is counter-clockwise. This is generally preferred because it achieves lower cutting forces, improved chip formation, better tool life, and superior surface finish .
-
Reverse Rotation (Conventional Milling): The helix is clockwise like the spindle rotation. This creates an up-milling condition that may be necessary in certain situations.
For most applications, climb milling (synchronous) is the best practice—the tool is fed in the direction of tool rotation, providing the lowest cutting forces and best surface finish . This is particularly helpful when cutting hardened materials.
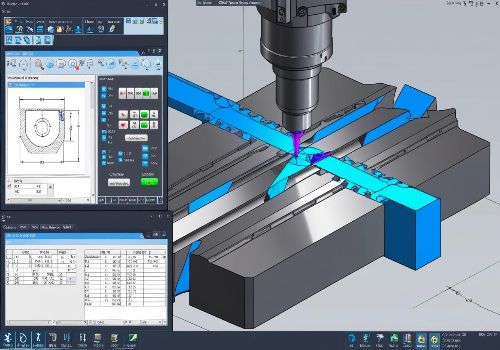
Mastering Toolpath Strategy: The Gradual Lead-In/Out Advantage
One of the most significant advancements in thread milling strategy is the gradual lead-in and lead-out approach .
Traditional thread milling toolpaths often engage the tool abruptly, creating stress concentrations and potential tool deflection. The gradual strategy, now available in modern CAM systems like Mastercam, generates lead-in and lead-out moves that coincide with tool manufacturer recommendations .
How Gradual Lead-In Works
The tool engages the radial depth through a helical motion over a 180-degree arc sweep. Throughout this motion, the tool engages 1/2 pitch deep before achieving full radial and axial thread depths .
For an internal thread, the tool motion begins 180 degrees from the start point of the thread. A helical motion, traveling 1/2 pitch axially, gradually engages the tool throughout the lead-in. For lead-out, the same motion is reversed—the tool gradually exits 180 degrees radially from the last point of full engagement while traveling 1/2 pitch .
Result: Reduced tool stress, better surface finish, and extended tool life.
Multi-Pass Strategies: Protecting Tool and Part
Thread milling doesn’t have to be a single-pass operation. In fact, for larger threads or harder materials, multiple radial passes are a best practice .
The Progressive Pass Approach
A proven method used in high-output cells :
-
First pass: Conservative, to prevent micro-chipping at the entry point
-
Middle passes: Stable cutting where chip control is strongest, gradually removing material
-
Final passes: Light finishing passes to protect flanks and achieve gauge-perfect results
The logic is simple: you don’t want to fight the thread at the end of the cycle. You want the end of the cycle to be clean, controlled, and repeatable .
Modern CAM software allows precise control over step-over variation. You can specify the radial depth of cut for each pass, create equal radial depths, or use an “even until last” strategy where the final pass removes the remaining material .

Feeds, Speeds, and Chip Control
Finding the Sweet Spot
Thread milling calculators (like G-Wizard) are invaluable for establishing starting parameters . Key inputs include:
-
Tool diameter and number of flutes
-
Cut depth (thread length)
-
Cut width (difference between major and minor diameter)
-
Material type
A practical approach: start with conservative speeds—you can always go faster, but a broken tool stops production. Lower RPM generally improves tool life, especially in hardened materials .
Chip Evacuation Strategy
Chip control in thread milling is different from tapping. Thread mills generate short, comma-shaped chips, whereas taps can create long, stringy “bird’s nests” . However, chip removal remains critical.
Best practices include :
-
Pecking cycles: Periodically retracting the tool to clear chips, especially in deeper threads
-
Coolant strategy: While dry machining is often recommended, use coolant for stainless steel (reduces work hardening), aluminum (reduces chip welding), and cast iron (dust control)
-
Through-tool coolant: Particularly important for evacuating chips in blind holes
Toolholding and System Rigidity
Thread milling amplifies alignment errors. A tiny angular mismatch that might be acceptable in standard milling can ruin flank geometry and shift pitch diameter in threading .
Toolholding Best Practices
Most thread mill manufacturers recommend set-screw type toolholders (Weldon shanks) over ER collet chucks for thread milling . The positive drive and superior grip of Weldon holders minimize tool pull-out and deflection under the varying loads of helical interpolation.
Rigidity Checklist
-
Reduce tool overhang by 5–10 mm where possible
-
Verify the insert seat is clean and undamaged at every change
-
Standardize clamping torque—don’t rely on “hand tight”
-
Re-check center height after tool changes or machine incidents
-
Use the same setup method across all shifts

Thread Milling vs. Tapping: Making the Right Choice
Knowing when to thread mill versus tap is itself a strategy. Here’s a decision framework based on application requirements :
| When to Choose Tapping | When to Choose Thread Milling |
|---|---|
| High-volume production | Expensive or difficult materials (Inconel, titanium) |
| Standard thread sizes | Need for flexibility in thread sizes |
| Limited CNC capabilities | Blind holes with chip evacuation challenges |
| Speed is the priority | Precision and thread quality are critical |
| Smaller diameter holes | Large diameter threads |
| Simple setups | Avoiding tap breakage risk in expensive parts |
The key insight: while tapping wins on speed, thread milling wins on flexibility, safety, and quality .
Troubleshooting Common Thread Milling Issues
Notching and Exit Chipping
Notching at the depth-of-cut line and chipping at entry/exit are expensive because they create sudden failures rather than gradual wear. They’re common in alloy steels, hard spots, scaled surfaces, and interrupted cuts .
Solution: Choose a geometry family that resists notching, then protect it with a sensible pass plan. When you see a sharp wear groove appearing repeatedly at the same location, or failures clustering near thread start/exit, it’s time to adjust your strategy .
Profile Distortion
If the thread profile appears distorted, check your tool diameter against the 70% rule. Also verify that your CAM program’s helix angle compensation is correct—especially for helical flute tools .
Burr Formation
Sudden burr growth after a small number of parts often signals that chip flow has become unstable. Experienced operators judge a threading setup by chip behavior first and gauge results second .
Conclusion: Building a Reliable Thread Milling System
Successful thread milling isn’t about finding one magic setting—it’s about creating a controlled system where every element works together . The best strategies encompass:
-
Tool selection matched to your specific application requirements
-
Gradual lead-in/out toolpaths that protect the tool during engagement
-
Multi-pass strategies that distribute load and protect final passes
-
Rigid toolholding with standardized setup procedures
-
Appropriate speeds and feeds optimized for the material
-
Chip control through pecking, coolant strategy, and tool geometry
When these elements align, thread milling becomes not just reliable, but predictable—delivering consistent thread quality across shifts, operators, and batches .
Need help with your threading applications? Upload your design files for a free quote and let our machining experts recommend the optimal thread milling strategy for your specific requirements.